Ceedling Tutorial / Kickstart Guide
This guide provides a kickstart for using Ceedling for unit testing in this repository.
Video version
1. What is Ceedling?
Ceedling is a build system focused on test-driven development in C. It integrates other open-source tools:
- Unity: A unit testing framework for C.
- CMock: A tool for creating mock objects from C header files.
- CException: A simple exception handling framework.
It automates the process of creating and running tests, making it easier to write and maintain unit tests for C projects, especially in an embedded context.
2. Installation
Ceedling is a Ruby gem, so you need to have Ruby installed.
2.1. Install Ruby
- Windows: Download and install Ruby from rubyinstaller.org. It is recommended to use a version like 3.0.x, as newer versions might have compatibility issues. Make sure to add Ruby to your
PATH. - Linux: Use your distribution's package manager. For example, on Debian/Ubuntu:
sudo apt-get install ruby
2.2. Install Ceedling
Once Ruby is installed, open a terminal and run:
gem install ceedlingThis will install Ceedling and its dependencies.
2.3. Verify Installation
You can verify the installation by running:
ceedling version3. Creating a Ceedling Project
To create a new Ceedling project, navigate to the directory where you want to create your project and run:
ceedling new <project_name> <directory>This will create a new directory with the specified name, containing the basic Ceedling project structure:
project.yml: The main configuration file for your project.src/: You can delete this directory, we use the CubeMX Src directory.test/: Directory for your test files.build/vendor/: Contains the source for Ceedling's dependencies like Unity and CMock.
For our workflow, just run this command in the workspace root, where CMakeLists.txt also resides:
ceedling new .4. Writing a Test
Let's say you have a module calculator with a header file src/calculator.h and a source file src/calculator.c.
src/calculator.h:
#ifndef CALCULATOR_H
#define CALCULATOR_H

int add(int a, int b);

#endif // CALCULATOR_Hsrc/calculator.c:
#include "calculator.h"

int add(int a, int b) {
    return a + b;
}
To test the add function, you would create a test file test/test_calculator.c:
test/test_calculator.c:
#include "unity.h"
#include "calculator.h"

void setUp(void) {
    // Set up code, executed before each test
}

void tearDown(void) {
    // Tear down code, executed after each test
}

void test_add_should_returnTheSumOfTwoIntegers(void) {
    // Test case
    TEST_ASSERT_EQUAL(5, add(2, 3));
}
#include "unity.h": Includes the Unity test framework.#include "calculator.h": Includes the header of the module under test.setUpandtearDown: Functions that are run before and after each test.test_...: Test functions must start withtest_.TEST_ASSERT_EQUAL: A Unity assertion macro. The test passes if the two arguments are equal.
5. Mocking with CMock
CMock allows you to "mock" dependencies. Imagine your calculator now uses a hardware abstraction layer (HAL) to get a value.
src/adder_hal.h:
#ifndef ADDER_HAL_H
#define ADDER_HAL_H

#include <stdint.h>

uint16_t adder_hal_GetValue(void);

#endif // ADDER_HAL_Hsrc/calculator.c:
#include "calculator.h"
#include "adder_hal.h"

uint16_t calculator_AddBaseValue(uint16_t input_value)
{
    uint16_t base_value = adder_hal_GetValue();
    return input_value + base_value;
}
To test calculator_AddBaseValue without calling the actual HAL function, you can mock adder_hal.h.
test/test_calculator.c:
#include "unity.h"
#include "calculator.h"
#include "mock_adder_hal.h" // Include the mock header

void test_calculator_AddBaseValue_should_AddCorrectly(void) {
    // Expect the mock function to be called and return 10
    adder_hal_GetValue_ExpectAndReturn(10);

    // Call the function under test
    uint16_t result = calculator_AddBaseValue(5);

    // Assert the result
    TEST_ASSERT_EQUAL(15, result);
}
#include "mock_adder_hal.h": By including this file (which doesn't exist yet), you are telling Ceedling to create a mock foradder_hal.h.adder_hal_GetValue_ExpectAndReturn(10): This is a CMock expectation. It tells the mock to expect a call toadder_hal_GetValueand, when called, to return10.
6. Running Tests
To run all tests, navigate to the root of your Ceedling project and run:
ceedling test:allCeedling will then build and run all your tests and provide a summary of the results.
7. VSCode extension
The standard Ceedling extension works for Ceedling 1.0.0+, but the debugging feature is broken, so I've used a fork of said extension. I had to manually compile it.
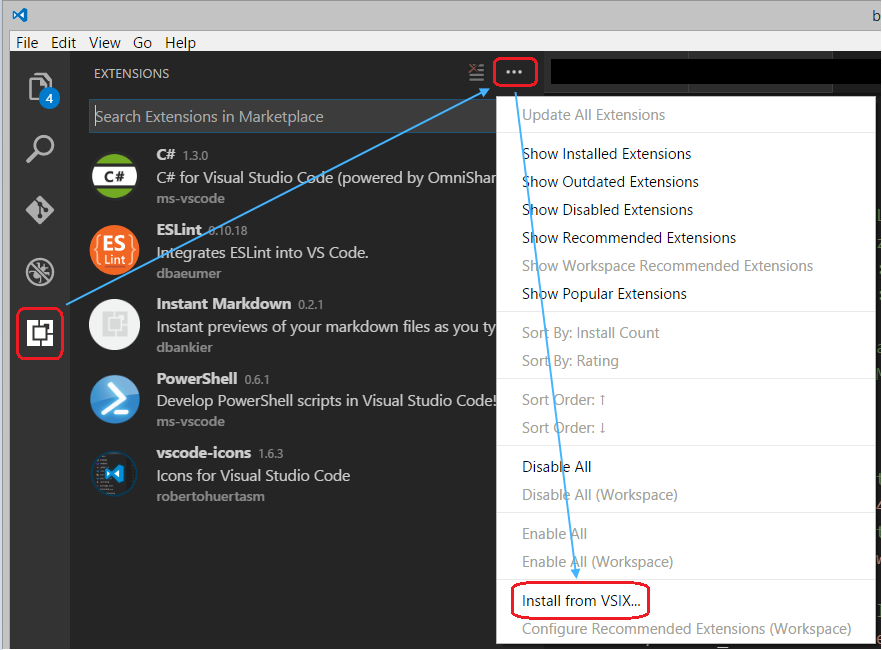
To install it, go to extensions, click on the three dots and select Install from VSIX. Choose this file.